Thursday, August 16, 2012

My Pocket Diaper Pattern

Oh yea, I have a blog to not forget about for weeks on end!
So here's my pattern. I couldn't find any that fit my babe just right. He's super tall with monster thighs, but not fat. Tougher to find than it sounds! All of the diapers and covers I make are this pattern and Cloth Revolution. Cloth Revolution is a side snap pocket (envelope or sham) or AIO that I have grown immensely fond of! And the PDF includes a guide for virtually everything you could need to know for the entire sewing process. LOVE! I highly recommend it! Also, I mentioned covers. You can use this pocket pattern to make a cover with FOE easily. Just eliminate the pocket flap and don't add a seam allowance. EASY!
This pattern is so adaptable. For approximately 12-28 lbs, I would guesstimate. But it can be manipulated by tweaking the seam allowance. Use as a pocket, AIO or cover with just a few alterations. Use snaps or hook and loop. Top stitch or use FOE. Make them decorative or simple, for OS or fitted. GO CRAZY! I certainly have had the fever. Use as many or few of the snaps from the guide as you want. Skip rows for a more fitted diaper or use the whole lot for a complete OS.
Let me preface by saying: If you're having problems with leaking or otherwise, go through the checklist of diaper sewing no-nos! Too often times, people don't do their research or stick with the standard techniques, then they wonder why their diaper leaks...
1.) Use a small ballpoint needle. Size 8 or 9 or whatever. Nothing larger than an 11. Ballpoint will ensure that the PUL is only stretched open, rather than ripped, so it can be reseamed.
2.) Use only 100% polyester thread. Cotton blends will wick.
3.) Some people have to use a walking foot. I can work with either one. Use vegetable oil on the slick side of your PUL if you can't afford a walking foot. But let me assure you, the walking foot is much faster!!
4.) Use adequate inserts and soakers. 90% of the time, home made diapers 'don't work out' because they're not absorbent enough. But they're too bulky, you say. Then either change more often or buy higher quality absorbancy materials. It will pay off. Especially when you're changing pjs multiple times a night. A yd of hemp fleece will make about 10 OS doublers for $11 a yd. Same with Zorb for $6 a yd! Don't be a cheapo! It's still less than half of a commercial cloth diaper.

Depending on if you use a novelty print, snaps or velcro and types of materials the ranges of price of a diaper an insert range from $3-$7. When I make a fancy shmancy one with an awesome decorative strip, snaps, microfleece and hemp, it's about $6 for materials. Piss you off a bit that you pay $20 and up to buy one?! Don't get your panties in a wad yet. This takes lots of time, skill and practice to make a great quality diaper. Anybody can do it but it takes a while to do it beautifully.

So here's the pattern. If you have problems "Saving As" then I can figure out how to use a PDF file sharing site. This just seemed quicker and more lazy.


Forgive me, I couldn't draw a straight line if I tried. Tape pattern together using the stars as a guide. I use the snap guide by poking holes in the guide itself. Then I dot through the holes with a wet erase marker, marking the diaper. Then continue with your awl and snaps.

Unfortunately today is laundry day and most of our diapers are dirty. But these will do for reference.

Starting at top left, we have a smaller OS pocket with decorative wings. When you use fabric wings you save lots of PUL but it's only good for a daytime diaper. I would NOT recommend it for night time. Especially for a stomach sleeper. Maybe for a back sleeping girl, I wouldn't know. But its great for using scraps. It also utilizes an old fleece blanket as the wicking layer. It pills, but it was my scrap diaper. I'm pleased.
Top right is a perfect OS pocket. Suedecloth, decorative mustaches, perfection.
At the bottom is a ghetto cover. (All the other covers are dirty!) Hidden PUL, FOE and velcro. This is the only diaper I've made with hidden PUL. I've never had any trouble with it, believe it or not! I rounded the edges and used FOE for the first time. I recommend everyone try FOE at least once if you like covers and prefolds.

Ok, so there it is. I've put my heart and soul into diaper making and this pattern. Please let me know if I need to add anything or if you have any questions!! If you like the pattern, I'd love to see your creations!! Happy diapering!

 Delicious!

Wednesday, July 25, 2012

My Mission. And Pads... lots of pads...

Hello World! I'm Clair. I've been inspired to create this blog, not just for the crafty, but for those in need. I'm reminded of a girl who was due with a child around the same time as Maverick. She was seriously considering giving her baby up for adoption because she was concerned that she couldn't provide things like diapers and milk for him. She was a great mom, just for being concerned for her child's well-being. Being a first time mom myself, I didn't have a whole lot of firsthand advice for her. I wish I could go back and tell her everything I know about cloth diapering and breastfeeding and overall frugal living that I now know about. Since I cannot, this blog is inspired by those that can benefit from re-purposing, reusing and creating with your own two hands. Which is everybody! Including my future great great grandchildren, who I pray don't have to live on top of a landfill and drink cancer water. This one's for you, kiddos!

So, on a possibly weird note, we will begin today's lesson! Reusable cloth menstrual pads! Ewwww, that's so taboo!!!! I know! (Be glad I didn't say cloth tampons... yes, people use those!) But if you can wipe your own ass everyday or wash cloth diapers or birth a child, you can wash your own damn pads. Get real. It's actually more common than you think! In the spirit of recycling, I will show you how to make one light/medium flow/pantyliner pad from a pair of dude's underwear.

You will need:
  • One pair of boxer briefs
  • Scissors
  • Sewing Machine (or needle and thread, bless you for being that patient.) 
  • Snaps or velcro or a mechanism to keep the wings attached and on your undies. I recommend KAM.
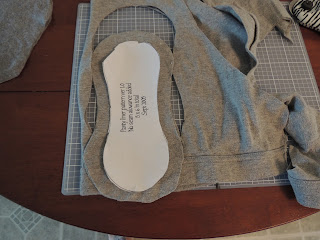
  • A pattern. Drawn to suit your needs or premade. In this case, I used SheWhoRunsInTheForest. She has a few free patterns that I'm very excited to try. For this one, I will pretty much give her same instructions but from undies and I have more to say about it. (of course.) 


First cut off the elastic and stash it for another nifty project! Then I cut the seam along the crotch. You don't have to do this yet but I find it's easier.


While leaving your material doubled, cut your base liner. This particular pattern does NOT have a seam allowance so be sure to add whatever is appropriate for your sewing needs.


Now cut your filling from the skinny cooter area. It doesn't have to be perfect because it will be covered but make sure it's not outrageously wonky because you want the topstitch to catch it.


Now cut your pad lining. Again, give a seam allowance.


Search what's left for any patch of fabric that you can make another layer of filling from. I found a piece in the butt. You can leave it at 2 or add a few more. Whatever to suit your needs.


So here's your two liner pieces. Add a small slit in one. It'll come in handy in a minute.


Now sew those puppies together! Then pull it outside right.


Then topstitch so it looks like this!


Do the same for the pad liner. Sew, turn inside out but DON'T TOPSTITCH! Stuff it with your padding instead.


Now put your wrong sides together.


Then sew it on and add your snaps! Don't make it all ugly like mine was though!


They fold up to be pretty discreet! If you can't sew a straight line, like myself, use your medium zigzag stitch to make it less noticeable. I was using the wrong stitch because I was distracted by Yo Gabba Gabba. However, it serves the same purpose. I personally don't care what they look like because I'm just going to bleed on them. Gross. But by the time you've got a small stash, you'll have the hang of it, if you're not watching Yo Gabba Gabba of course. Now that you're a recycling genius, experiment with fabric scraps, old towels, rags, receiving blankets and tshirts! Just a couple goes a long way!
Now, care and storage- to wash em, soak them in COLD water for at least a few hours, better overnight, the wash with a phosphate free detergent, like something you would use for cloth diapering. I use FOCA and All free and clear as my cloth detergents. You can use Tea Tree Oil if you have a smell or antibacterial issue but use SPARINGLY. DO NOT use hot washes because it will set the blood stain in. You can dry these, or better yet, sun them. The sun is a natural bleach and sanitizer! And it's free! Hooray! For storage, store in a wet/dry bag. You can buy them if you sell your kidney. Or make your own from practically any waterproof material. PUL, vinyl, pottytraining pads, etc. Just be sure it's waterproof and your closure is sufficient so your bathroom doesn't smell like roadkill. (Yes, disgusting. Can you imagine soiled post postpartum pads sitting in a small bathroom?! My husband told me after I gave birth that it smelled like we were cleaning a deer. Thanks Hun,but no thanks.)
Excited about your next period!?! Me neither. But I do feel a little more thrifty.
I'll be back to show you diapers for dummies soon! Stay tuned!