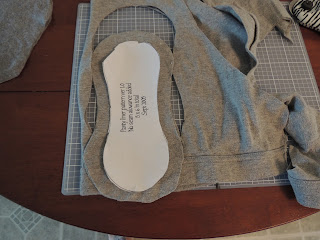
So, on a possibly weird note, we will begin today's lesson! Reusable cloth menstrual pads! Ewwww, that's so taboo!!!! I know! (Be glad I didn't say cloth tampons... yes, people use those!) But if you can wipe your own ass everyday or wash cloth diapers or birth a child, you can wash your own damn pads. Get real. It's actually more common than you think! In the spirit of recycling, I will show you how to make one light/medium flow/pantyliner pad from a pair of dude's underwear.
You will need:
- One pair of boxer briefs
- Sewing Machine (or needle and thread, bless you for being that patient.)
- Snaps or velcro or a mechanism to keep the wings attached and on your undies. I recommend KAM.
- A pattern. Drawn to suit your needs or premade. In this case, I used SheWhoRunsInTheForest. She has a few free patterns that I'm very excited to try. For this one, I will pretty much give her same instructions but from undies and I have more to say about it. (of course.)

First cut off the elastic and stash it for another nifty project! Then I cut the seam along the crotch. You don't have to do this yet but I find it's easier.
While leaving your material doubled, cut your base liner. This particular pattern does NOT have a seam allowance so be sure to add whatever is appropriate for your sewing needs.
 Now cut your filling from the skinny cooter area. It doesn't have to be perfect because it will be covered but make sure it's not outrageously wonky because you want the topstitch to catch it.
  Now cut your pad lining. Again, give a seam allowance.
  Search what's left for any patch of fabric that you can make another layer of filling from. I found a piece in the butt. You can leave it at 2 or add a few more. Whatever to suit your needs.
 So here's your two liner pieces. Add a small slit in one. It'll come in handy in a minute.
  Now sew those puppies together! Then pull it outside right.
 Then topstitch so it looks like this!
 Do the same for the pad liner. Sew, turn inside out but DON'T TOPSTITCH! Stuff it with your padding instead.

Now put your wrong sides together.
Then sew it on and add your snaps! Don't make it all ugly like mine was though!
They fold up to be pretty discreet! If you can't sew a straight line, like myself, use your medium zigzag stitch to make it less noticeable. I was using the wrong stitch because I was distracted by Yo Gabba Gabba. However, it serves the same purpose. I personally don't care what they look like because I'm just going to bleed on them. Gross. But by the time you've got a small stash, you'll have the hang of it, if you're not watching Yo Gabba Gabba of course. Now that you're a recycling genius, experiment with fabric scraps, old towels, rags, receiving blankets and tshirts! Just a couple goes a long way!
Now, care and storage- to wash em, soak them in COLD water for at least a few hours, better overnight, the wash with a phosphate free detergent, like something you would use for cloth diapering. I use FOCA and All free and clear as my cloth detergents. You can use Tea Tree Oil if you have a smell or antibacterial issue but use SPARINGLY. DO NOT use hot washes because it will set the blood stain in. You can dry these, or better yet, sun them. The sun is a natural bleach and sanitizer! And it's free! Hooray! For storage, store in a wet/dry bag. You can buy them if you sell your kidney. Or make your own from practically any waterproof material. PUL, vinyl, pottytraining pads, etc. Just be sure it's waterproof and your closure is sufficient so your bathroom doesn't smell like roadkill. (Yes, disgusting. Can you imagine soiled post postpartum pads sitting in a small bathroom?! My husband told me after I gave birth that it smelled like we were cleaning a deer. Thanks Hun,but no thanks.)
Excited about your next period!?! Me neither. But I do feel a little more thrifty.
I'll be back to show you diapers for dummies soon! Stay tuned!


